 Октябрь 2nd, 2018
  Evgeniy Kamenev
 Пример создания Continuous Integration/Continuous Delivery процесса для проекта, написанного на Java
За основу был взят репозитарий, форкнутый с https://github.com/mitesh51/spring-petclinic
и его реализация в книге Jenkins Essentials.2nd edition by Mitesh Soni
Все подготовительные работы(установка и интеграция Jenkins,Maven,SonarQube,Nexus) были выполнены в предыдущих статьях:
Установка и настройка Jenkins,Maven,SonarQube,Nexus на Centos 7
Установка и настройка SonarQube на Ubuntu 16
Установка и настройка Nexus на Ubuntu 16
Интеграция Jenkins,Maven,SonarQube,Nexus
Установка Apache Tomcat сервера на Ubuntu 16
1.Создание pipeline-petclinic-declarative (несмотря на название сборки в Jenkinsfile будет использоваться scripted тип pipeline, а не declarative)
|
1 2 3 4 5 |
Получение кода из репозитария – stage Preparation Cборки проекта, запуска Junit-тестов – stage Build Анализа кода средствами SonarQube - stage SonarQube analysis Копирования артифакта в Nexus-репозитарий – stage Copy artifacts to Nexus-repo Архивированиие артифактов и запуск второй сборки(freestyle-petclinic-deploy) - stage Archive Artifacts and Deploy |
2.Создание freestyle-petclinic-deploy сборки для копирования артифактов(war-файла) из сборки pipeline-petcinic-declarative и деплоя приложения на удаленный Tomcat-сервер
3.Создание freestyle-petclinic-perftest сборки для запуска нагрузочного тестирования раздеплоенного в Tomcat-сервере приложения и публикации результатов тестирования в Jenkins
Порядок выполнения сборок имеет вид
|
1 |
pipeline-petclinic-declarative->freestyle-petclinic-deploy->freestyle-petclinic-perftest |
После чего шаг №3 перенесем внутрь сборки pipeline-petclinic-declarative т.е. сборку 3 не будем использовать, а ее функционал реализуем как stage ‘Load Stage’ в сборке 1
Т.е. порядок выполнения сборок будет иметь вид
|
1 |
pipeline-petclinic-declarative->freestyle-petclinic-deploy |
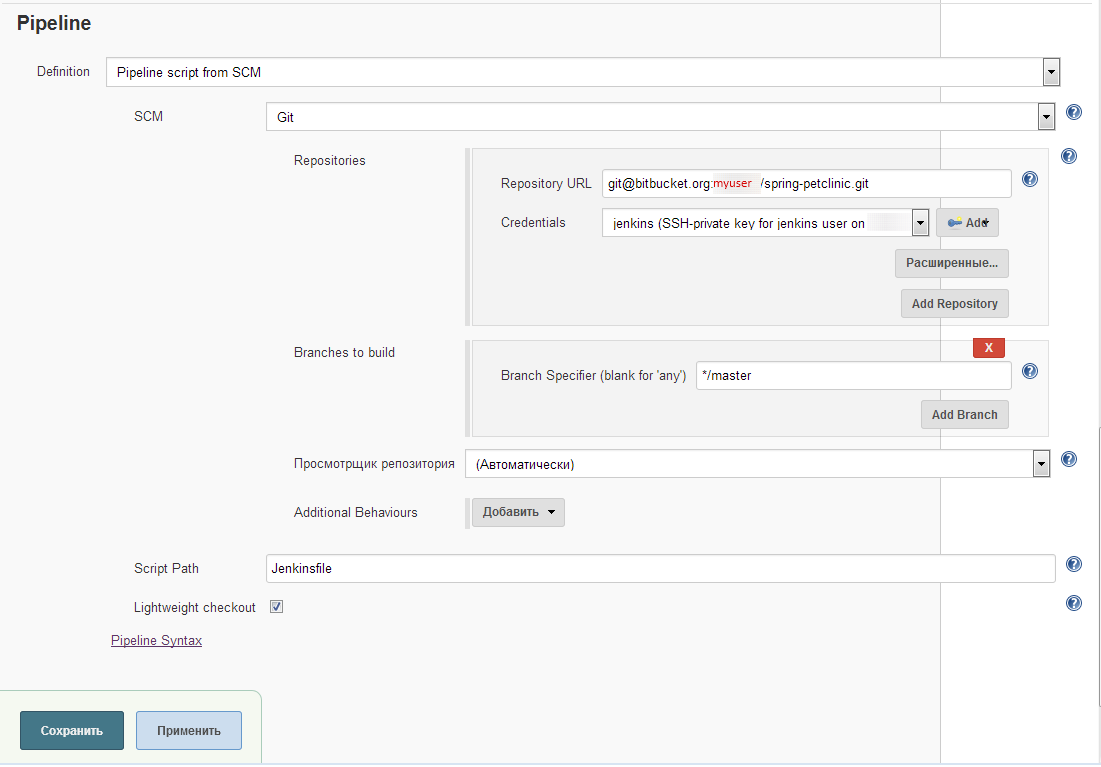
1.Создание pipeline-petclinic-declarative Jenkinsfile в корне репозитария проекта, который нужно собирать имеет вид
|
1 2 3 4 5 6 7 8 9 10 11 12 13 14 15 16 17 18 19 20 21 22 23 24 25 26 27 28 29 30 31 32 33 34 35 36 37 38 39 40 41 42 43 44 45 46 47 48 |
node { def mvnHome // Get PetClinic code from a Bitbucket repository stage('Preparation') { git branch: 'master', credentialsId: 'jenkins-user-ssh-key', url: 'git@bitbucket.org:mybitbucketuser/spring-petclinic.git' // Get the Maven tool.This 'maven-demo' Maven tool must be configured in the global configuration. mvnHome = tool 'maven-demo' } stage('Build') { sh "'${mvnHome}/bin/mvn' clean package" // Publish JUnit Report junit '**/target/surefire-reports/TEST-*.xml' } stage('SonarQube analysis') { //This 'my-sonarqube-scanner' Sonarqube scanner tool must be configured in the global configuration. def scannerHome = tool 'my-sonarqube-scanner'; // Sonarqube must be configured in the Jenkins: Configuration -> Add SonarQube withSonarQubeEnv('my-sonarqube-demo') { //provide all required properties for Sonar sh "'${scannerHome}/bin/sonar-runner' -Dsonar.host.url=$SONAR_HOST_URL -Dsonar.login=$SONAR_AUTH_TOKEN" } } /* Or via maven plugin for sonar (without usage sonar-runner) withSonarQubeEnv('my-sonarqube-demo') { sh "'${mvnHome}/bin/mvn' sonar:sonar" } } */ stage('Copy artifacts to Nexus-repo') { sh "'${mvnHome}/bin/mvn' -Dmaven.test.failure.ignore deploy" } stage('Archive Artifacts and Deploy') { // Archieve the artifact archiveArtifacts 'target/*.war' // Copy Artifact from this Pipeline Project into freestyle-petclinic-deploy using Copy Artifact plugin // Execute the freestyle-petclinic-deploy build to deploy war file into Tomcat build 'freestyle-petclinic-deploy' } } |
Сборка pipeline-petclinic-declarative
2.Создание freestyle-petclinic-deploy сборки для копирования артифактов(war-файла) из сборки pipeline-petcinic-declarative и деплоя приложения на удаленный Tomcat-сервер
1.Установка необходимых плагинов в Jenkins
— Copy artifact
— Deploy war/ear to a container
2.Добавление пользователя в Tomcat
Создадим для Jenkins отдельного пользователя с правом выполнять скрипты
|
1 |
# nano /opt/tomcat/conf/tomcat-users.xml |
|
1 2 3 4 |
…… <role rolename="manager-script"/> <user username="jenkins-tomcat" password="mypassword" roles="manager-script"/> …… |
|
1 |
# systemctl restart tomcat |
3.Cоздание в Jenkins пользователя с паролем, который указан в конфигурационном файле tomcat
|
1 |
Jenkins->Configure Jenkins->Credentials->System->Global credentials->Add credentials |

4. Создание freestyle-проекта в Jenkins freestyle-petclinic-deploy
Копирование артифакта с проекта pipeline-petclinic-declarative, на котором он был собран

Разворачивание приложения на Tomcat-сервере
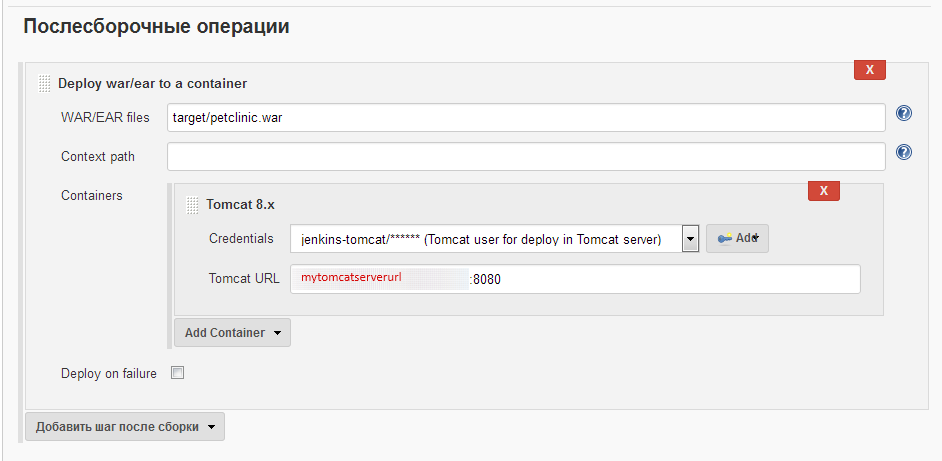
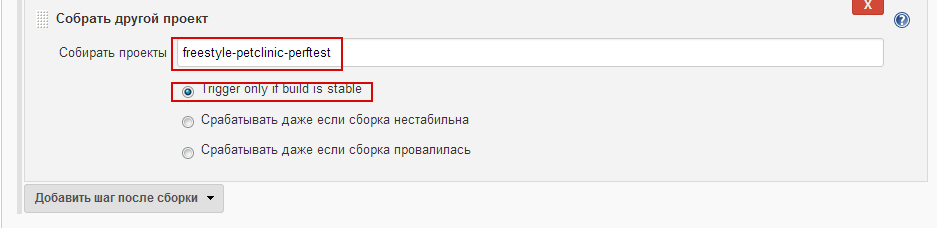
Вызов другой сборки freestyle-petclinic-perftest (будет создана позже)
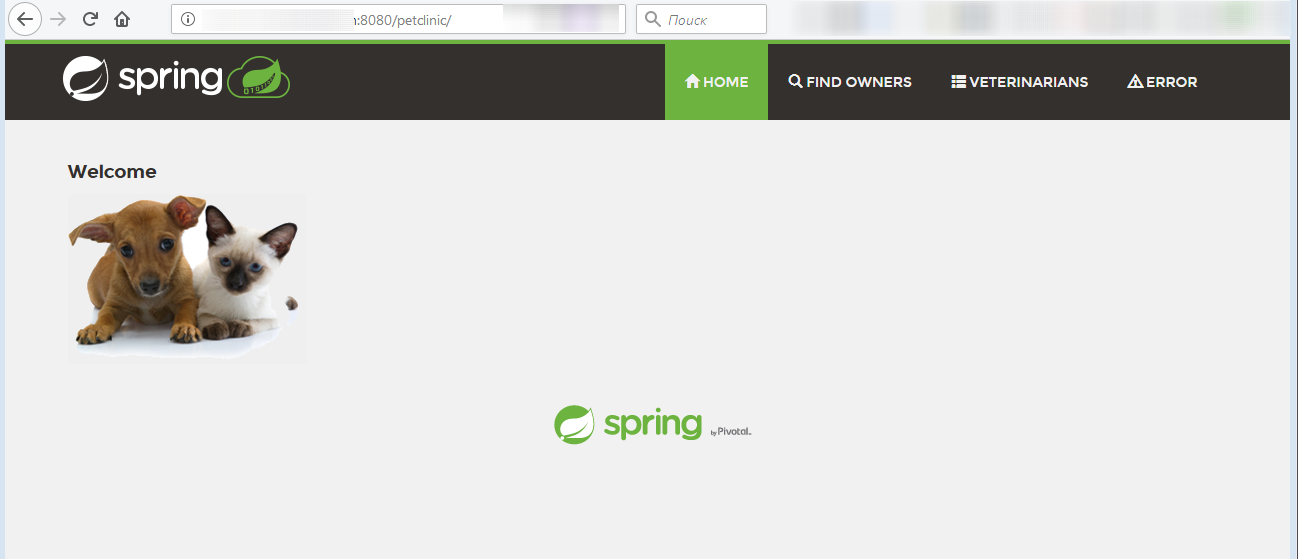
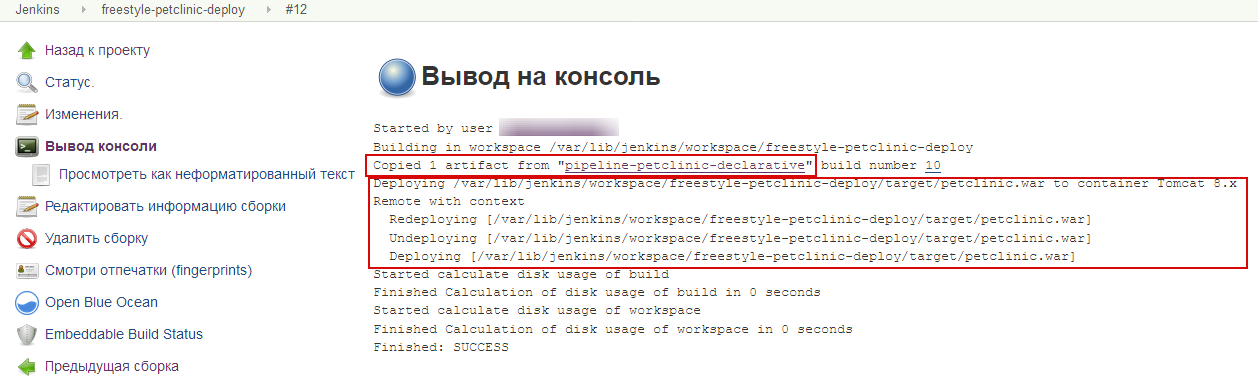
Запускаем сборку freestyle-petclinic-deploy и проверяем раздеплоенное приложение на Tomcat-сервере
http://<mytomcatservername>:8080/->Manager App->/petclinic
Логи сборки
3.Создание freestyle-petclinic-perftest сборки для запуска нагрузочного тестирования раздеплоенного в Tomcat-сервере приложения и публикации результатов тестирования
1.Создание Apache JMeter файла тестирования
Apache-Jmeter
Скачиваем Apache Jmeter с http://jmeter.apache.org/download_jmeter.cgi
Извлекаем файлы с архива и переходим в каталог bin
Выполняем файл jmeter.bat или jmeter.sh в зависимости от операционной системы
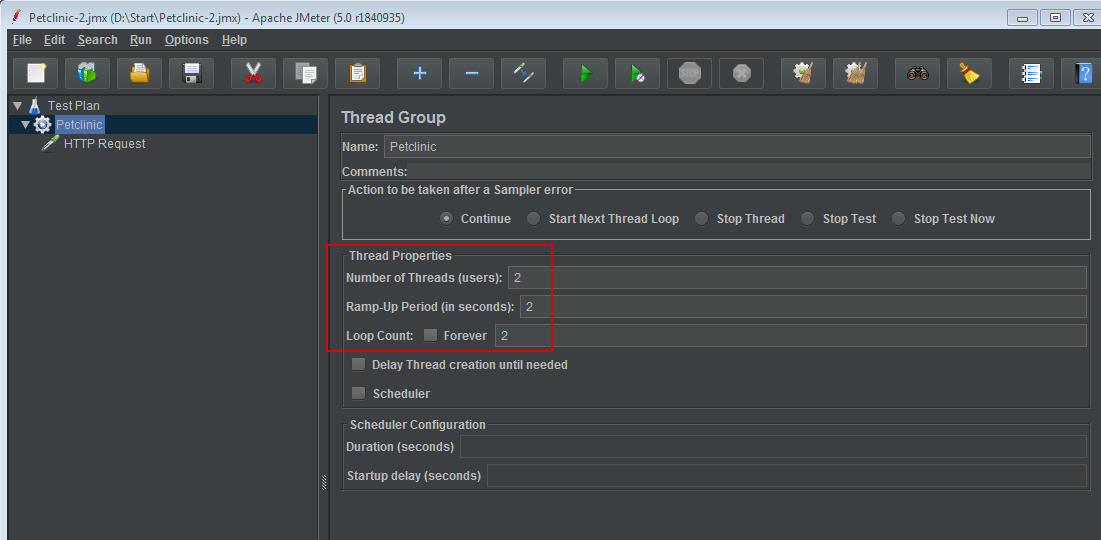
В результате чего открывается Apache Jmeter Console, в которой создаем наш план тестирования
Далее привожу пошаговую инструкцию п созданию плана тестирования, взятую из книги.
|
1 2 3 4 5 6 7 8 9 10 |
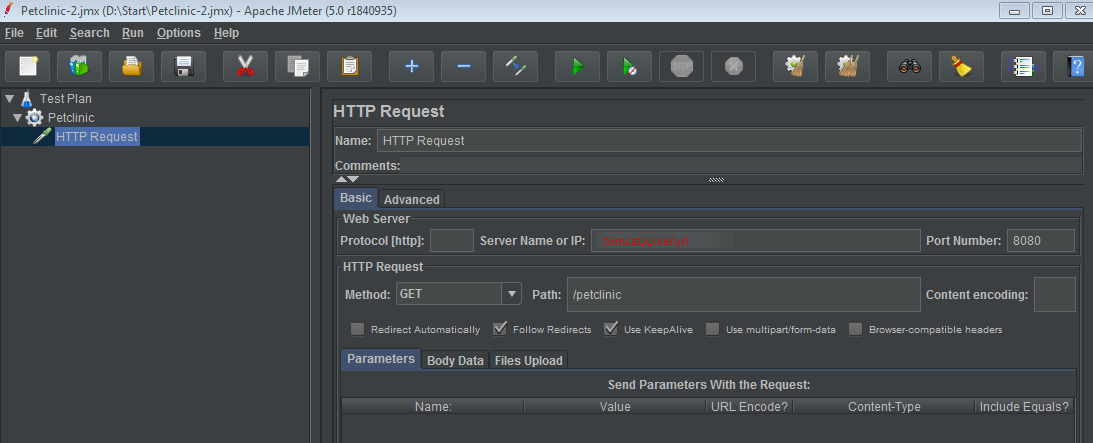
Right-click on the Test Plan and click on Add; select Threads (Users). Select Thread Group. Provide Thread Group name.(Petclinic) In Thread Group properties, provide Number of Threads, Ramp-up Period, and Loop Count. Right-click on Thread Group. Click on Add. Click on Sampler. Click on HTTP Request. In HTTP Request, provide Server Name or IP. In our case, it will be localhost or an IP address. Give the Port Number where your web server is running. Select the Get method and provide a path to the load test: |
|
1 2 3 |
ServerName: mytomcatservername Port:8080 URL/path: petclinic |
Save the .jmx file.(например, под названием Petclinic.jmx)
Например, я создал этот файл в ApacheJmeter под Windows
2.Установка Apache-jmeter на Jenkins-серверe(на Ubuntu16)
|
1 |
# cd /opt |
|
1 |
# wget http://apache.ip-connect.vn.ua//jmeter/binaries/apache-jmeter-5.0.tgz |
|
1 |
# tar xzvf apache-jmeter-5.0.tgz |
|
1 |
# mv apache-jmeter-5.0 apache-jmeter && rm -rf apache-jmeter-5.0.tgz |
|
1 |
# mkdir /opt/jenkins |
Просмотр доступных опций Jmeter
|
1 |
# /opt/apache-jmeter/bin/jmeter.sh --? |
Просмотр помощи(примеров) использования jmeter
|
1 |
# /opt/apache-jmeter/bin/jmeter.sh –h |
Для нас предстваляет интерес следующая команда
To run Apache JMeter in NON_GUI mode:
|
1 |
# jmeter.sh -n -t test-file [-p property-file] [-l results-file] [-j log-file] |
Загружаем созданный в Windows в Apache Jmeter план тестирования (файл Petclinic.jmx) в каталог /var/lib/jenkins/scripts/
Изменяем владельца/группу на Jenkins для каталога scripts
|
1 |
# chown -R jenkins:jenkins /var/lib/jenkins/scripts/ |
3.Создание freestyle-проекта в Jenkins freestyle-petclinic-perftest
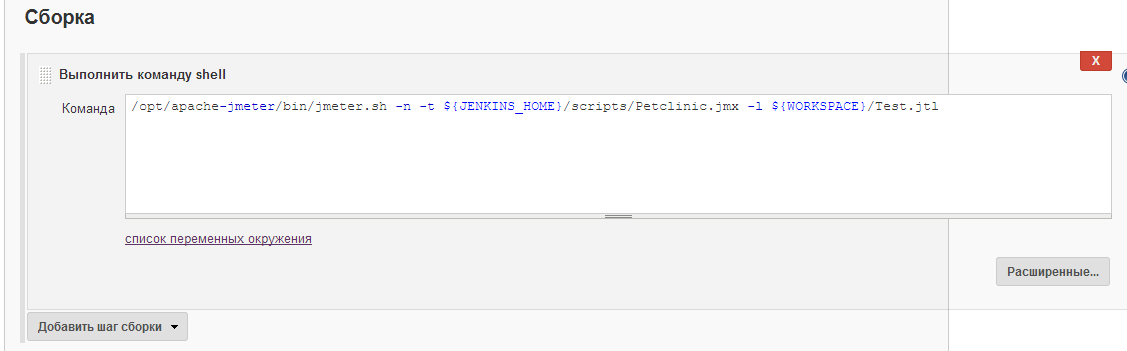
Добавляем шаг сборки, на котором выполняем bash/shell-команду
|
1 |
# /opt/apache-jmeter/bin/jmeter.sh -n -t ${JENKINS_HOME}/scripts/Petclinic-2.jmx -l ${WORKSPACE}/Test.jtl |
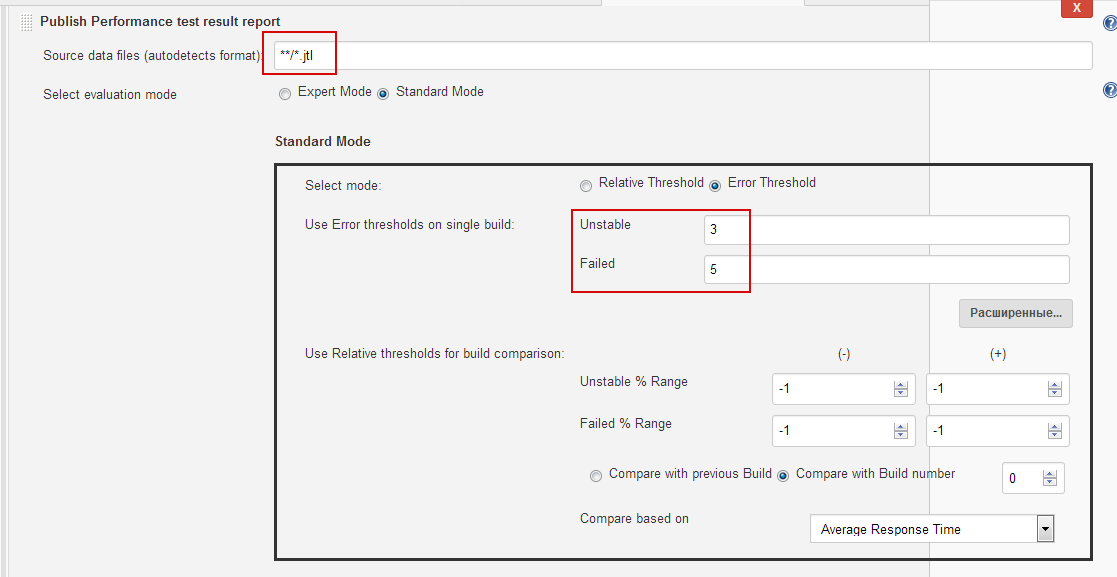
Добавляем послесборочный шаг по анализу отчета Jmeter(файла Test.jtl) и публикации отчета
Например, выставим пороги для установки статуса сборки как нестабильной при 3 и более процентов ошибок и статуса провалившейся сборки – при 5% и более
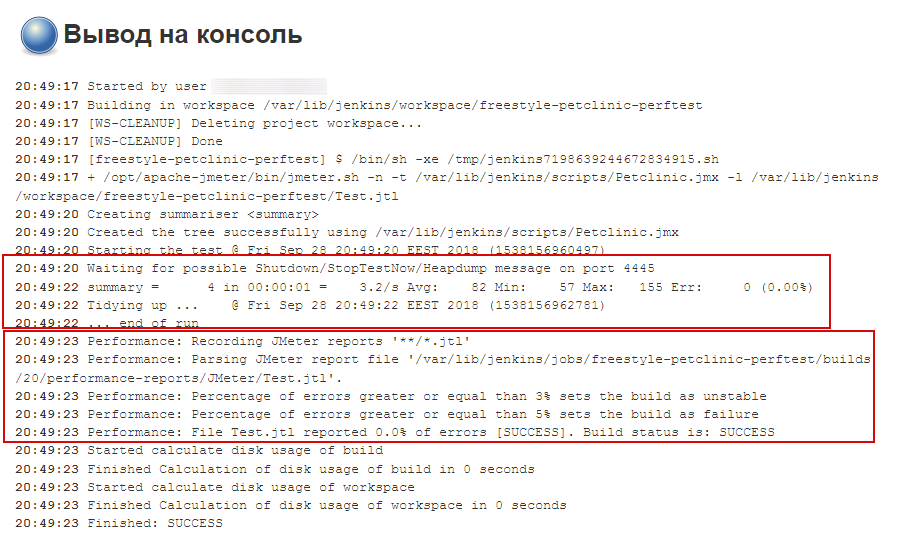
Запускаем сборку freestyle-petclinic-perftest и проверяем
Логи сборки
Наличие отчетов на вкладке Performance Trend
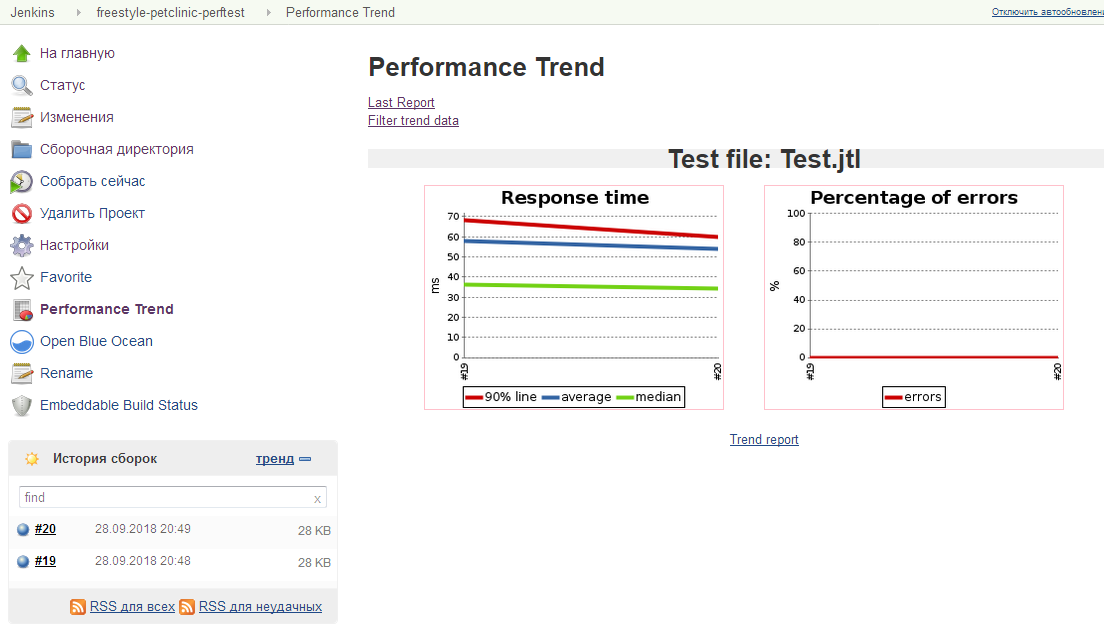
Trend report
![]()
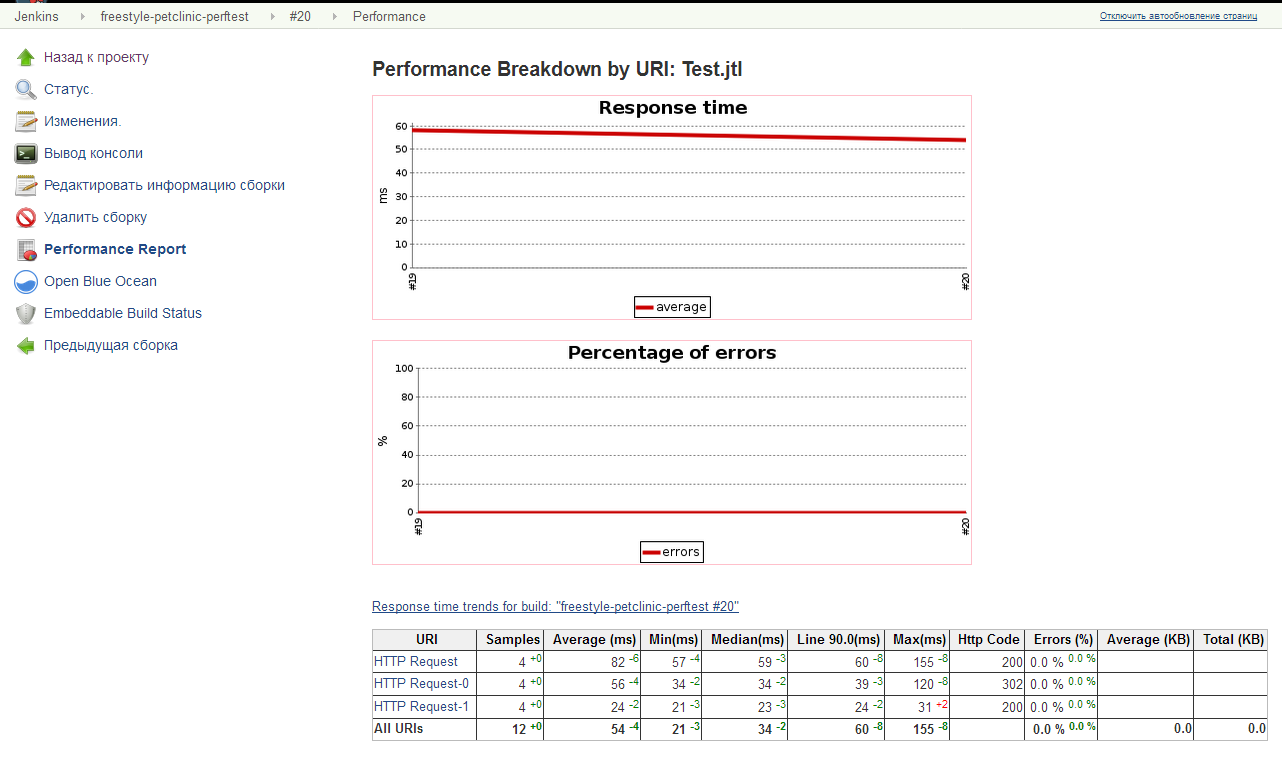
Last report
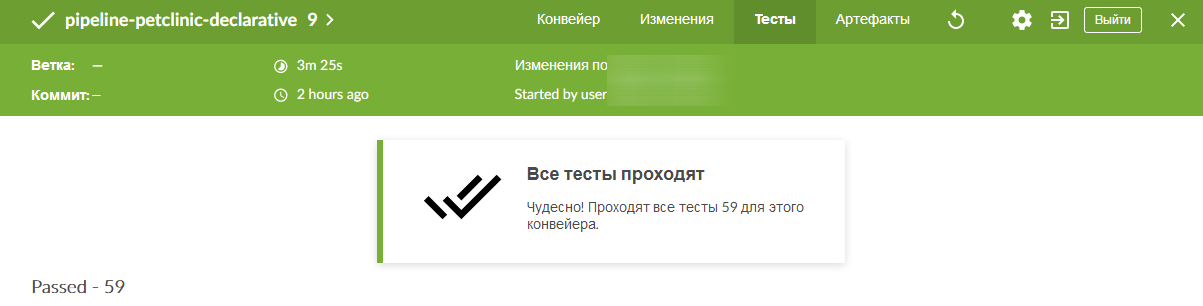
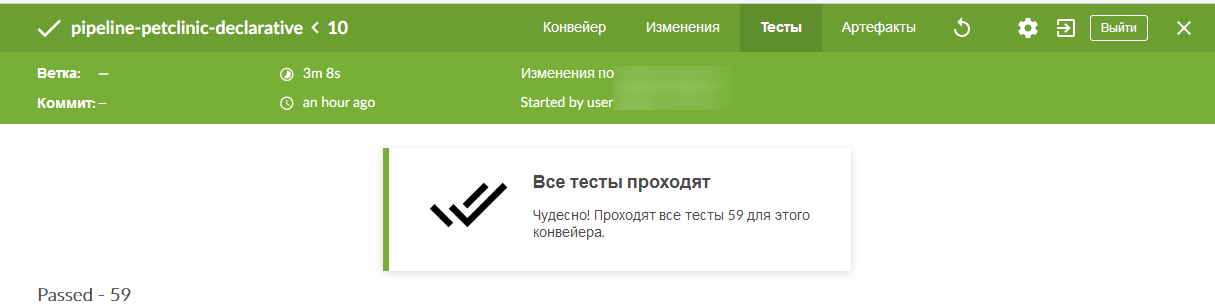
Теперь можна запускать сборку проекта pipeline-petclinic-declarative и проверять полный CI/CD-цикл, заложенный в функционале всех ранее созданных сборок.
Blue Ocean визуализация для сборки pipeline-petclinic-declarative


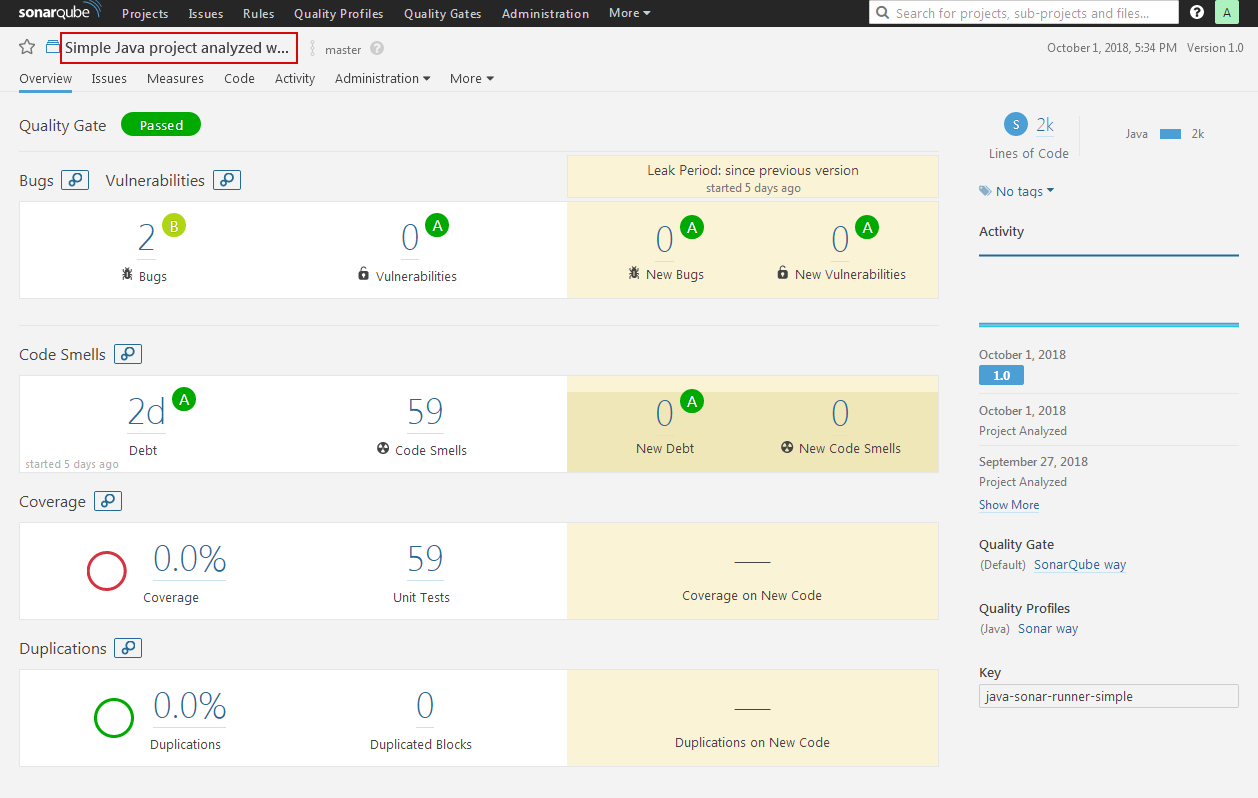
SonarQube
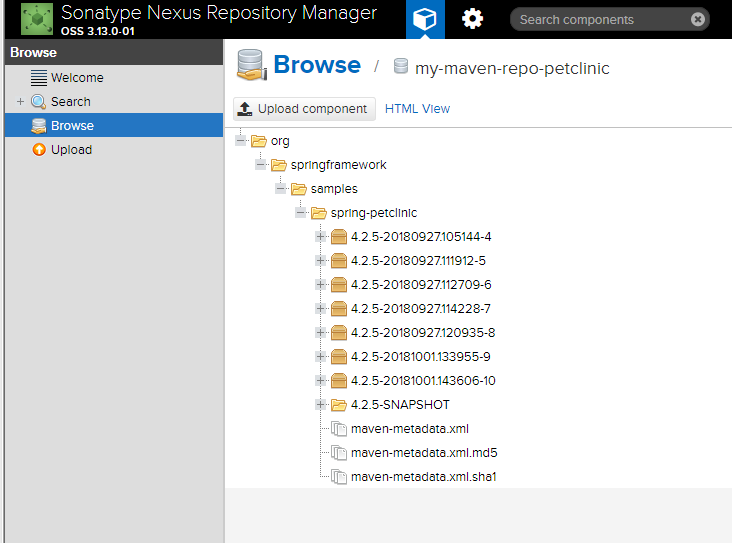
Nexus-maven-репозитарий
Добавляем этап по нагрузочному тестированию в Jenkinsfile на проекте pipeline-petclinic-declarative вместо использования/вызова сборки freestyle-petclinic-perftest
|
1 2 3 4 5 6 |
stage('Load Test') { // Execute command to perform load testing with the use of Apache JMeter sh "/opt/apache-jmeter/bin/jmeter.sh -n -t ${JENKINS_HOME}/scripts/Petclinic.jmx -l ${WORKSPACE}/Test.jtl" // Publish Apache JMeter results perfReport errorFailedThreshold: 5, errorUnstableThreshold: 3, percentiles: '0,50,90,100', sourceDataFiles: '**/*.jtl' } |
Т.е. весь Jenkinsfile на проекте pipeline-petclinic-declarative имеет вид
|
1 2 3 4 5 6 7 8 9 10 11 12 13 14 15 16 17 18 19 20 21 22 23 24 25 26 27 28 29 30 31 32 33 34 35 36 37 38 39 40 41 42 43 44 45 46 47 48 49 50 51 52 53 54 55 56 |
node { def mvnHome // for display purposes Get PetClinic code from a Bitbucket repository stage('Preparation') { git branch: 'master', credentialsId: 'jenkins-user-ssh-key', url: 'git@bitbucket.org:mybitbucketuser/spring-petclinic.git' // Get the Maven tool.This 'maven-demo' Maven tool must be configured in the global configuration. mvnHome = tool 'maven-demo' } stage('Build') { sh "'${mvnHome}/bin/mvn' clean package" // Publish JUnit Report junit '**/target/surefire-reports/TEST-*.xml' } stage('SonarQube analysis') { //This 'my-sonarqube-scanner' Sonarqube scanner tool must be configured in the global configuration. def scannerHome = tool 'my-sonarqube-scanner'; // Sonarqube must be configured in the Jenkins: Configuration -> Add SonarQube withSonarQubeEnv('my-sonarqube-demo') { //provide all required properties for Sonar sh "'${scannerHome}/bin/sonar-runner' -Dsonar.host.url=$SONAR_HOST_URL -Dsonar.login=$SONAR_AUTH_TOKEN" } } /* Or via maven plugin for sonar (without usage sonar-runner) withSonarQubeEnv('my-sonarqube-demo') { sh "'${mvnHome}/bin/mvn' sonar:sonar" } } */ stage('Copy artifacts to Nexus-repo') { sh "'${mvnHome}/bin/mvn' -Dmaven.test.failure.ignore deploy" } stage('Archive Artifacts and Deploy') { // Archieve the artifact archiveArtifacts 'target/*.war' // Copy Artifact from this Pipeline Project into freestyle-petclinic-deploy using Copy Artifact plugin // Execute the freestyle-petclinic-deploy build to deploy war file into Tomcat build 'freestyle-petclinic-deploy' } stage('Load Test') { // Execute command to perform load testing with the use of Apache JMeter sh "/opt/apache-jmeter/bin/jmeter.sh -n -t ${JENKINS_HOME}/scripts/Petclinic.jmx -l ${WORKSPACE}/Test.jtl" // Publish Apache JMeter results perfReport errorFailedThreshold: 5, errorUnstableThreshold: 3, percentiles: '0,50,90,100', sourceDataFiles: '**/*.jtl' } } |
В сборке freestyle-petclinic-deploy удалим вызов сборки freestyle-petclinic-perftest
т.к. после корректного завершения сборки freestyle-petclinic-deploy, вызванной на этапе Archive Artifacts в сборке pipeline-petclinic-declarative, будет выполнен шаг ‘Load Test’ из сборки pipeline-petclinic-declarative, который и выполнит тот функционал, который ранее выполняля сборка freestyle-petclinic-perftest
Запускаем сборку и проверяем наличие этапа Load Test и результатов тестирования на вкладке артефакты
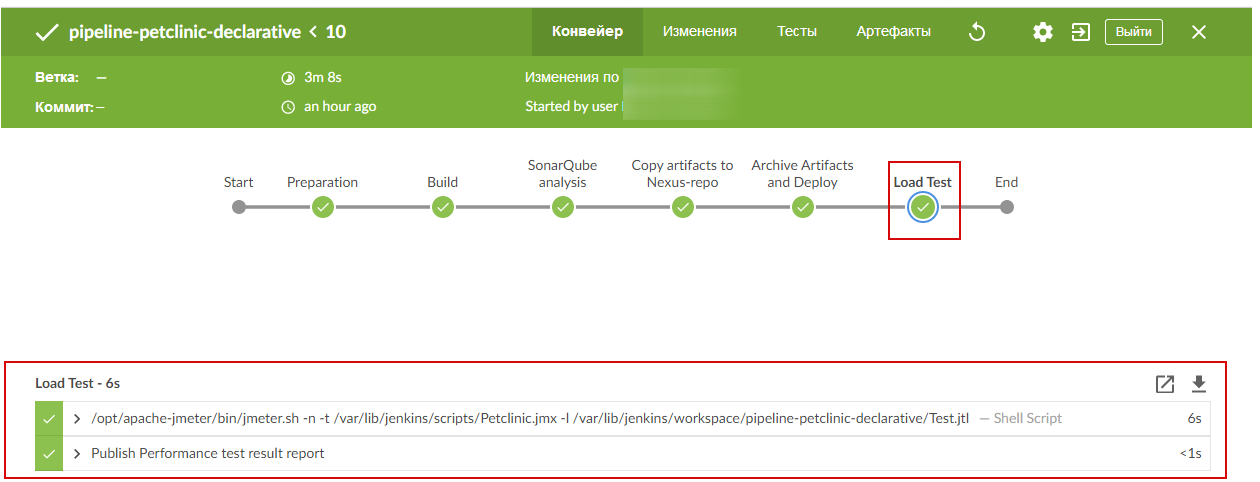
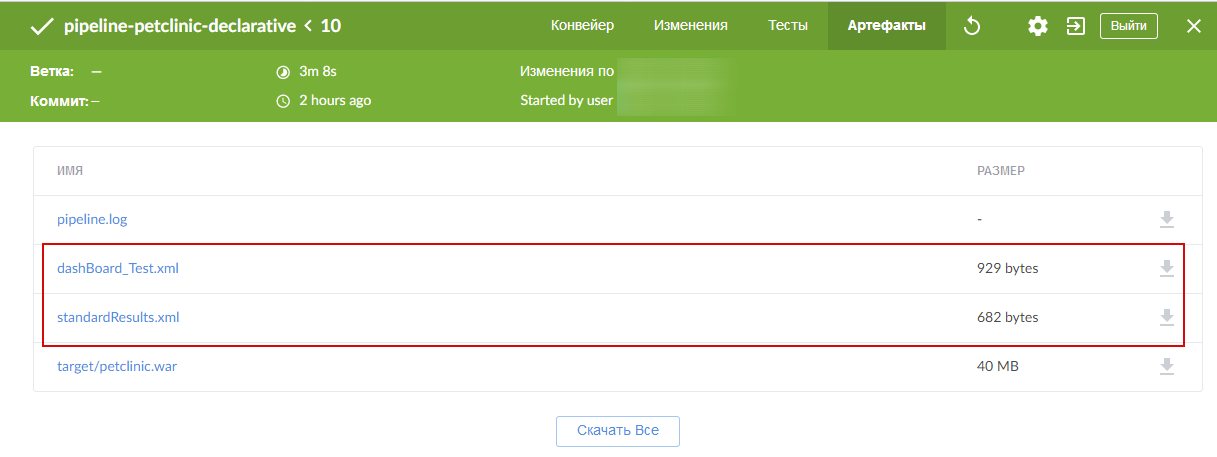
На вкладке Full Stage View сборки pipeline-petclinic-declarative

Источник: Книга Jenkins Essentials.2nd edition by Mitesh Soni
 Опубликовано в рубрике
  Метки: